Months ago, my husband saw a similar cake and said that he wanted a cake just like it. So, I decided to make him one for his 40th birthday this past week.
This cake was a total surprise for him, which created a whole new challenge...trying to make the cake while he wasn't home and in the few short hours I had available to do it.
I am proud to say I pulled it off! He had no idea!
This cake was 4 layers of 8" chocolate cake with chocolate frosting. I used a bowl and Rice Krispie Treats to shape the head. The legs and feet were also made from Rice Krispie Treats.
The hardest part of this cake was placing the yellow fondant over the whole thing. If you've ever done a fondant cake before you know it's difficult to place fondant over a tall cake without getting lots of wrinkles.
Because I was pressed for time before my husband got home, I wasn't able to get it as wrinkle free as I would have liked. I needed to clean up all the cake evidence in such a short amount of time!
I trimmed the bottom of the yellow fondant to cut off some of the wrinkles. It was going to be covered with the blue overalls anyway.
For the eye, I just cut a small circle of white fondant and covered it with brown and black for the pupil. I then gave it an eyelid and used part of a canning lid for the goggle.
As I was doing the hair, I thought it would be really funny to add some gray hairs since it was his 40th birthday. I just poked a hole into the yellow fondant and then added small bits of fondant for the hair. I added gumtex to the fondant to allow it to hold its shape.
I did the apple (bapple, if you've ever seen the Despicable Me shorts) last as a finishing touch.
He was very surprised and happy with his cake. I'm still not sure how I pulled it off without him knowing. I STILL have red food coloring on my hands from the apple, two days later! Talk about almost being caught red handed!
Showing posts with label 3 D cake. Show all posts
Friday, March 30, 2012
Tuesday, January 10, 2012
Hamburger & Fries
This "cake" was actually my son's idea for his 11th birthday. At first we were thinking one big cake, but I thought that having individual mini cakes for each child, would be a lot more fun.
Although they weren't that tricky to make, they did take quite a bit of time considering I made a dozen of these. They were a lot of fun though and a big hit at the party. The kids were a bit confused eating them!
The "buns" were made from the tops that I cut off of cupcakes. The "cheese" was made from fondant. It was probably my favorite part because I made it the exact color and thickness of sliced cheese. It looked EXACTLY like cheese! The "lettuce" was also made from fondant.
The "hamburger" is brownie. I used the bun as a guide and cut out the brownie using a fork to give it a rough edge.
The "mayo", "ketchup" and "mustard" are just buttercream frosting, as well as the "sesame seeds".

The fries were really funny too. They were made from white fondant and then I used my airbrush to spray them. They turned out a little darker than I was going for, but they were still fine.
We told the boys to come to eat and had the table set up for "dinner". They were quite confused when they saw their plate! I will definitely have to do these again...they were great fun!
Although they weren't that tricky to make, they did take quite a bit of time considering I made a dozen of these. They were a lot of fun though and a big hit at the party. The kids were a bit confused eating them!
The "buns" were made from the tops that I cut off of cupcakes. The "cheese" was made from fondant. It was probably my favorite part because I made it the exact color and thickness of sliced cheese. It looked EXACTLY like cheese! The "lettuce" was also made from fondant.
The "hamburger" is brownie. I used the bun as a guide and cut out the brownie using a fork to give it a rough edge.
The "mayo", "ketchup" and "mustard" are just buttercream frosting, as well as the "sesame seeds".
The fries were really funny too. They were made from white fondant and then I used my airbrush to spray them. They turned out a little darker than I was going for, but they were still fine.
We told the boys to come to eat and had the table set up for "dinner". They were quite confused when they saw their plate! I will definitely have to do these again...they were great fun!
Sunday, November 6, 2011
Shotgun Cake
Yes....another gun cake! 
This one's a bit different than the last one. It was originally supposed to be just the gun, but in order to make it proportional, it would have ended up being a very small piece of cake. I decided to make the wood base as the cake instead and just add the gun to the top as decoration.
I made the whole gun out of Rice Krispie Treats and covered it with fondant. I then etched the design into the fondant.
I always try to do something new and different with each new cake I make. This time I got to create wood out of fondant. It really was a lot of fun! I practiced first on a small piece of fondant to check out the effect.
First, I etched lines into the fondant and gently swirled them around with my hand. Next, using a brush, I added some brown airbrush food coloring to the fondant. It's basically like staining real wood. The creases and imperfections pick up the darker color.
I then added small holes and made areas to look like knots in the wood. You basically can't go wrong with it. I'm very happy with how it turned out and I have plans to make a Thanksgiving cake with this newly discovered technique.
This cake is 3, 8" square cakes cut to fit the size of the gun. It is coffee flavored cake, topped with a layer of caramel and then chocolate buttercream frosting.
Sunday, July 31, 2011
Military Rifle Cake
I have to admit I was a little intimidated by the thought of doing this cake. After it was all said and done, I'm very happy with the end result. The definite key to this cake was in the silver food coloring spray I bought. It really finished off the cake and gave it a nice metal look to it.
I started off by making the front section of the gun (by the way, this is an AR 15, military assault rifle). The very end is made with fondant and I used a straw to carve out a small hole. The long, thin piece is a straw covered in fondant...this is the only inedible part of the cake. The black barrel was made out of Rice Krispie Treats and then covered in fondant.
The main part of the cake is the only real "cake" section. I used a template to cut a section out of a frozen piece of cake. It was much easier to cut this way. The scope on top is made from Rice Krispie Treats and each end has a rock candy piece of "glass".
All the little details on this section are made out of fondant mixed with gumtex.
The end section is also made from Rice Krispie Treats. The bottom of the black area is made with fondant and gumtex, left to dry so that it would hold it's shape.
I used a small paintbrush to add the color to the gun. I mixed a small amount of black into the silver color so that it would look more like metal.
This was not my "normal" type cake, but I was willing to take on the challenge anyway.
Wednesday, July 13, 2011
Medieval Times
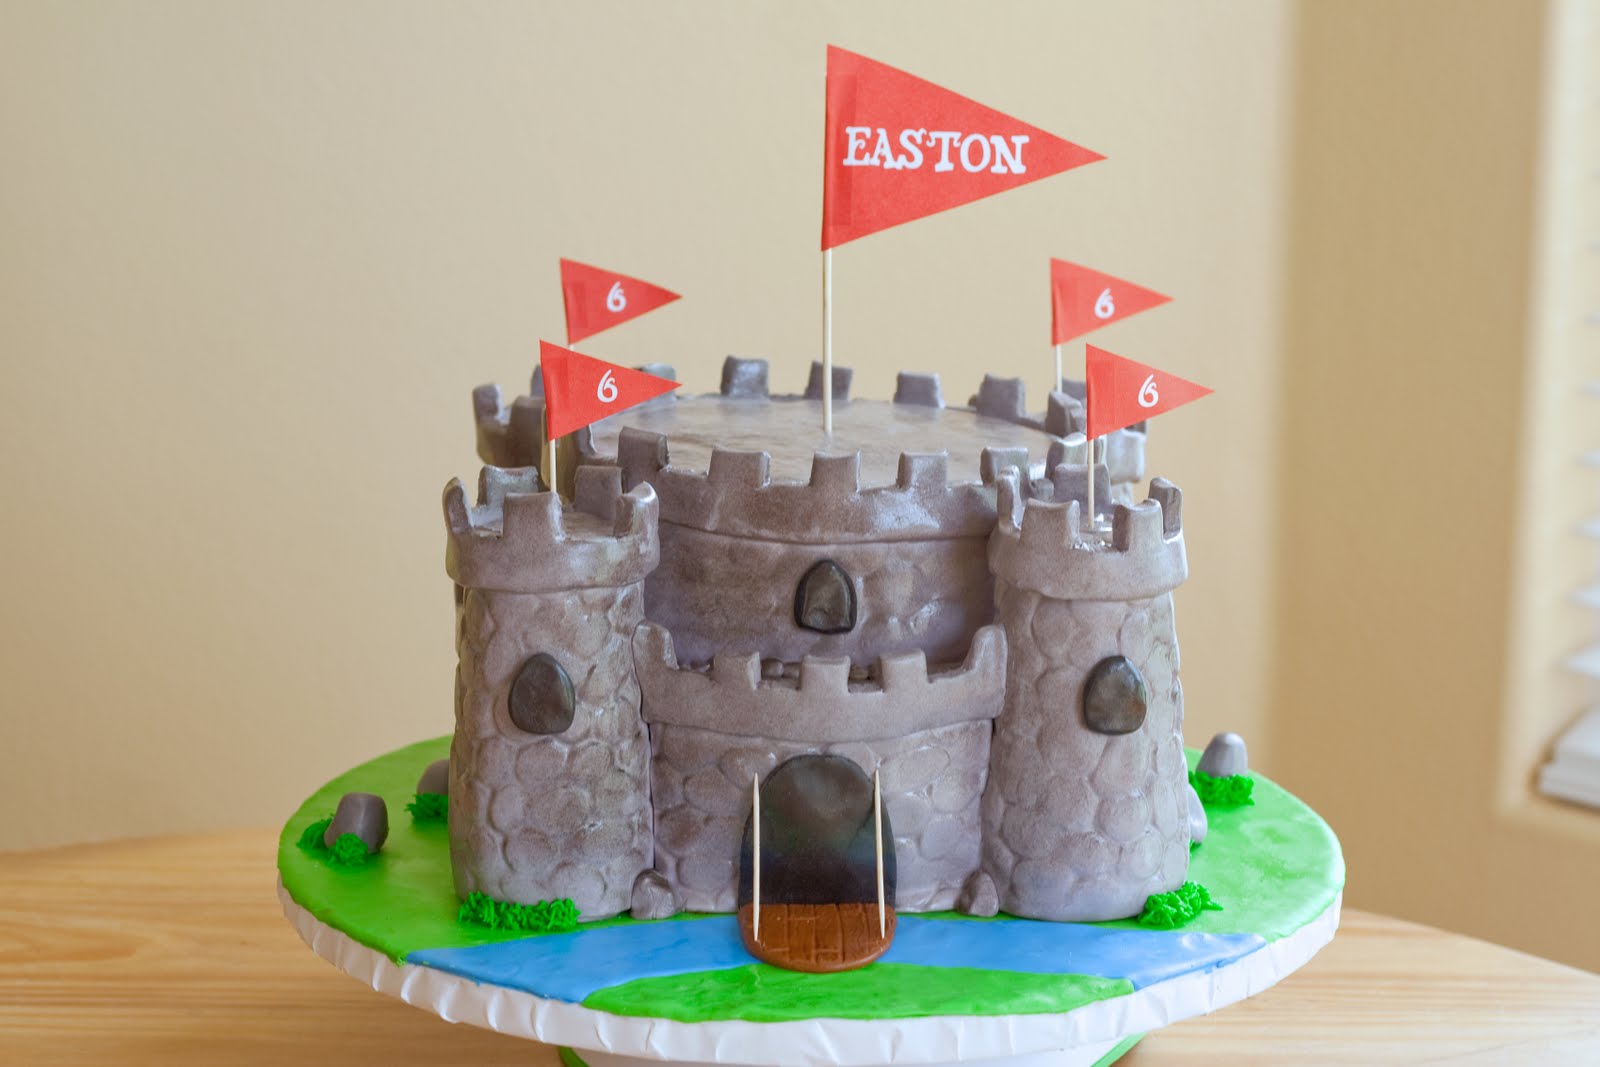
I know I always seem to say this, but this one was a lot of work! I had planned it a bit different initially, but as I was assembling the pieces, it got changed a bit. I'm happy with the final result though and actually think it turned out better this way.
The first thing I did after making the fondant (2 batches of grey fondant) is make the turrets (towers). They were made from Rice Krispie treats and I used a tall glass as the form.
Then I baked and frosted the cakes (10" & 8" rounds). I used the same glass that I made the turrets with to mark off small semi-circle areas on the bottom layer where I would be inserting them. I then cut those out with a very sharp knife. Once that was done I started adding fondant to the layers.
Starting with the bottom layer, I measured out the 4 small areas around the sides where I would be placing the fondant. After they were cut to size, I used a cobblestone impression mat to make the stone imprints onto the fondant.
I applied another layer of frosting as "glue" and placed the fondant onto the sides of the cake, being very careful not to make marks on the impressions. Once the sides were done, I used wax paper to cut out a template for the top. I followed the same method to place that onto the bottom layer.
For the top tier, I actually did it a bit different. I rolled fondant onto the cake and then used the impression mat on it afterwards. By this time, the cake was getting a little warm and it didn't take the impressions quite as well.
Next time, I will try doing the impression first before applying. I was just worried I would damage it as I was rolling it onto the cake.
For the turrets, I measured a piece that would wrap around and cut that out. I then frosted the towers and placed it down onto the middle of the piece of fondant. Then I wrapped the two sides around the tower and joined the two edges together. To make the impressions, I stood the tower up and gently rolled the impression mat around the towers. A small circular piece was added to the top of each tower.
Next came the edging around the tops. That was a bit tricky. I added gumtex to the fondant and then cut out a long strip of fondant. I then cut notches out of the strip. I then added it to the towers and the top tier. After that, I placed the towers onto the cake using frosting as glue to hold them in place. I then added the remaining pieces in between the towers.
Before adding all the finishing bits (windows, doors, flags, etc), I covered the base with wax paper and used my airbrush to lightly coat the grey with black to give it the appearance of stone. I don't think I did so bad considering it was 1am at this point!
Lastly, I added the windows, the door (made with a wood grain impression mat) and placed the flags onto the top. I also added some extra stones around the base and some grass to complete the look.
Overall, this cake took about 15 hours to make.
The first thing I did after making the fondant (2 batches of grey fondant) is make the turrets (towers). They were made from Rice Krispie treats and I used a tall glass as the form.
Then I baked and frosted the cakes (10" & 8" rounds). I used the same glass that I made the turrets with to mark off small semi-circle areas on the bottom layer where I would be inserting them. I then cut those out with a very sharp knife. Once that was done I started adding fondant to the layers.
Starting with the bottom layer, I measured out the 4 small areas around the sides where I would be placing the fondant. After they were cut to size, I used a cobblestone impression mat to make the stone imprints onto the fondant.
I applied another layer of frosting as "glue" and placed the fondant onto the sides of the cake, being very careful not to make marks on the impressions. Once the sides were done, I used wax paper to cut out a template for the top. I followed the same method to place that onto the bottom layer.
For the top tier, I actually did it a bit different. I rolled fondant onto the cake and then used the impression mat on it afterwards. By this time, the cake was getting a little warm and it didn't take the impressions quite as well.
Next time, I will try doing the impression first before applying. I was just worried I would damage it as I was rolling it onto the cake.
For the turrets, I measured a piece that would wrap around and cut that out. I then frosted the towers and placed it down onto the middle of the piece of fondant. Then I wrapped the two sides around the tower and joined the two edges together. To make the impressions, I stood the tower up and gently rolled the impression mat around the towers. A small circular piece was added to the top of each tower.
Next came the edging around the tops. That was a bit tricky. I added gumtex to the fondant and then cut out a long strip of fondant. I then cut notches out of the strip. I then added it to the towers and the top tier. After that, I placed the towers onto the cake using frosting as glue to hold them in place. I then added the remaining pieces in between the towers. Before adding all the finishing bits (windows, doors, flags, etc), I covered the base with wax paper and used my airbrush to lightly coat the grey with black to give it the appearance of stone. I don't think I did so bad considering it was 1am at this point!
Lastly, I added the windows, the door (made with a wood grain impression mat) and placed the flags onto the top. I also added some extra stones around the base and some grass to complete the look.
Overall, this cake took about 15 hours to make.
Wednesday, April 6, 2011
Tinkerbell
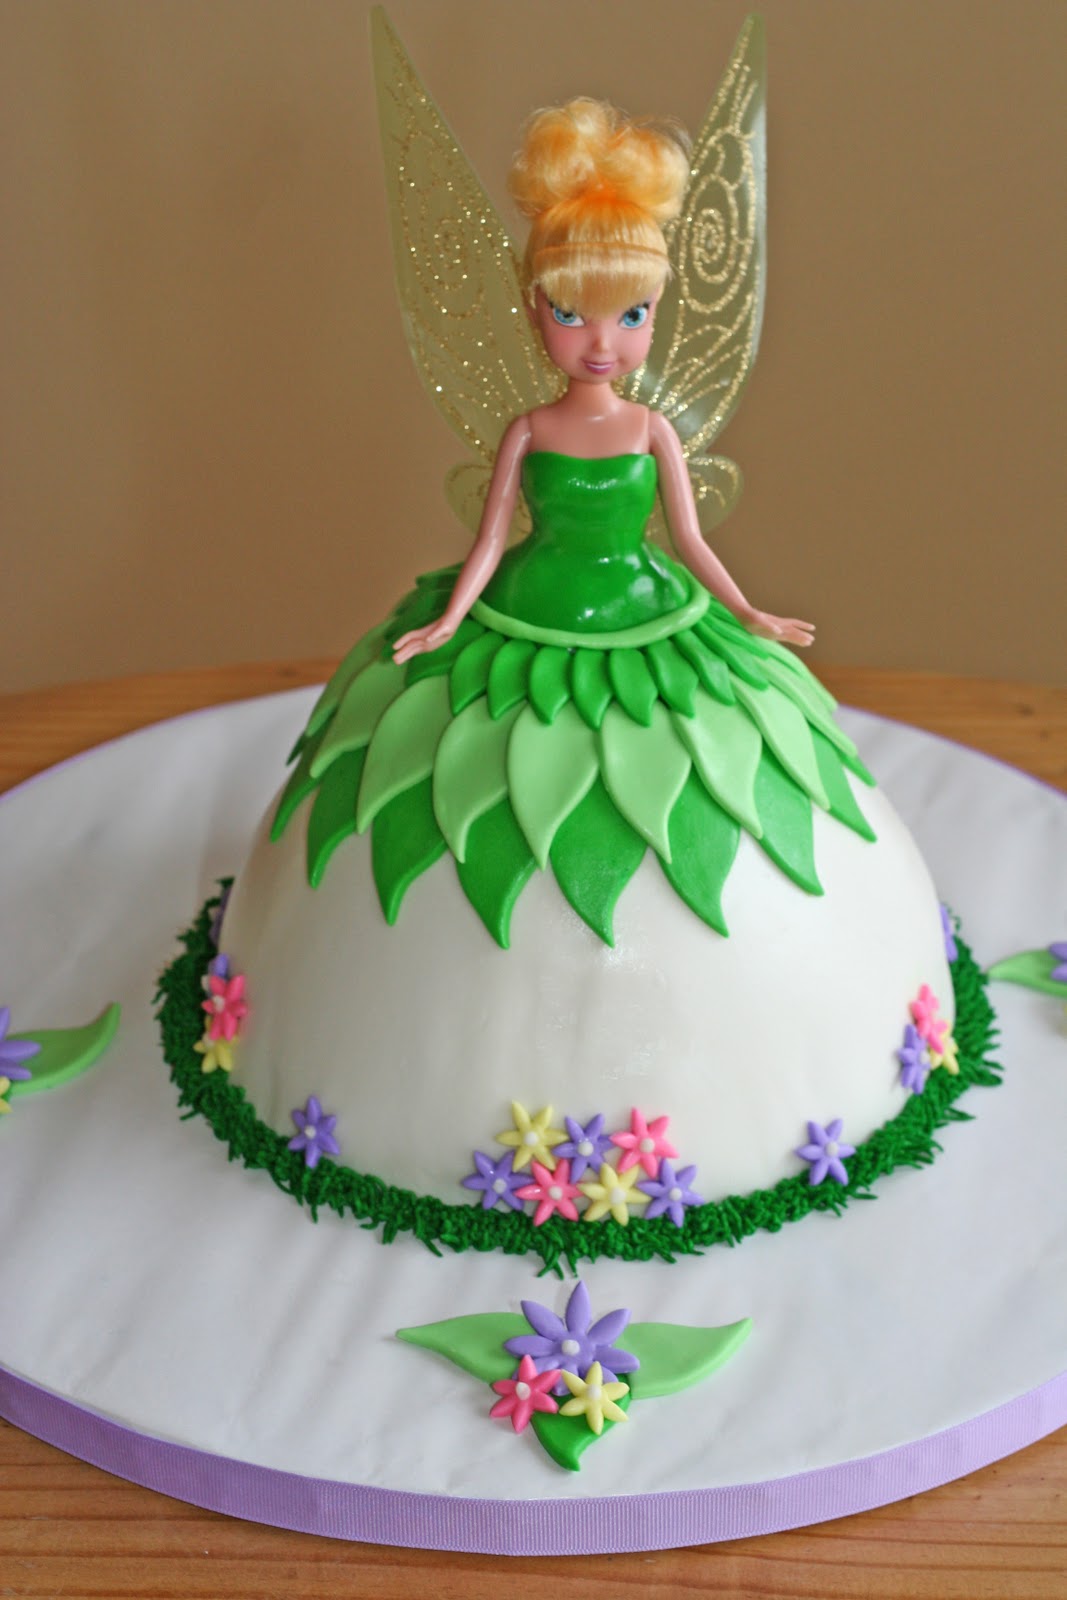
I have been wanting to do a doll cake so this was a perfect opportunity to do so!
This cake was made using a Wilton's cake pan especially for doll cakes. I made a vanilla cake with homemade strawberry frosting. The cupcakes were also vanilla, but had homemade vanilla buttercream frosting.
I made the flowers and leaves a few days ahead of time. I got to use my new fondant drying trays that allow you to dry the flowers in a curvy shape.
After adding the white fondant to the cake, I made a small hole and poked the doll into the top of the cake.
For the body of the dress, I just cut out a piece of fondant and wrapped it around the doll's bodice and sealed it in the back with a touch of water. The wings just pressed right onto the fondant.
Then, I started laying the leaves onto the cake starting on the bottom and working my way up. I then added some frosting "grass" around the bottom and the flowers as the finishing touch.
I also did the grass on the cupcakes along with some fondant flowers so that everything matched. I'm really happy with how she turned out as it was exactly what I was aiming for.
This cake was made using a Wilton's cake pan especially for doll cakes. I made a vanilla cake with homemade strawberry frosting. The cupcakes were also vanilla, but had homemade vanilla buttercream frosting.
I made the flowers and leaves a few days ahead of time. I got to use my new fondant drying trays that allow you to dry the flowers in a curvy shape.
After adding the white fondant to the cake, I made a small hole and poked the doll into the top of the cake.
For the body of the dress, I just cut out a piece of fondant and wrapped it around the doll's bodice and sealed it in the back with a touch of water. The wings just pressed right onto the fondant.
Then, I started laying the leaves onto the cake starting on the bottom and working my way up. I then added some frosting "grass" around the bottom and the flowers as the finishing touch.
P.S. This cake/cupcakes took about 10 hours total.
Subscribe to:
Posts (Atom)