Sunday, September 25, 2011

S'mores Truffles

I saw a recipe online for something called S'mores Truffles.  I figured since I love S'mores, I would give them a try.

You need: 6 Hershey Bars, Marshmallow Fluff, vanilla extract, Graham Crackers, heavy whipping cream and powdered sugar.

First, using a small circle cookie/fondant cutter, make 12 circles out of the Hershey Bars and Graham Crackers.

Then for the marshmallow filling, mix 2 cups of fluff, 1 teaspoon of vanilla and 2 tablespoons of cream with an electric mixer.  Mix this until it's well blended.  Then gradually add 2 1/2 cups of powdered sugar until the mixture becomes stiff.


Roll the mixture into balls and place between the chocolate and crackers.  Place in the fridge for 1/2 an hour to chill.

Meanwhile, melt the remaining chocolate (including the chocolate pieces you cut from) using a double broiler. 


Dip the S'mores into the chocolate until coated, sprinkle with crumbled crackers and place back into the fridge to harden.


ENJOY!!!
Monday, September 12, 2011

Wedding Cake

This is an 8" square cake for the bottom tier and a 6" square tier for the top.

The bottom tier is a  Chocolate Pound Cake. It is made up of 3 layers with chocolate buttercream frosting in between each layer.  The outer layer of frosting is vanilla buttercream frosting so that it wouldn't show through the white fondant.  I used a pound cake due to the height and to give it extra stability.  I had never made a chocolate pound cake before, but I have to say....it was DELICIOUS!!

The top layer is Devil's Food Cake (3 layers) with the same frosting as the bottom tier.  

Both tiers were 4 inches tall.
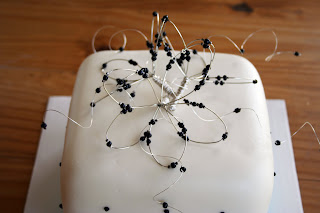
This is a picture of the top tier with the cake topper.  I made this topper based on the photograph I had been given.  At first, I wasn't sure how I was going to make this, but did some research on jewelry with wire/beads.  This topper consists of 3 wire/bead "flowers" that I arranged and wired together.  I also added some wire strings with beads.


I learned quite a bit making this topper and it was definitely a fun experience.  I guess I can add this form of artwork to my resume as well now.


I also got to make royal icing for the first time with this cake.  This is what I made the black dots out of.  First, I made measurements and marked the cake with an edible pen writer where the dots needed to be.  Then I just went back and added the dots with the royal icing.  They turned out really well.

The cake was finished off with some turquoise ribbon around the bottom of the tiers to match the bride/groom's colors.  This is the finished result on display at the wedding reception.